A quick setup guide for Windows development with recommended configurations.
![[Warning]](images/warning.svg) | Warning |
|---|---|
|
Unless you know exactly what you are doing, you should strictly follow the recommendations below. They are known to work and if the build breaks, please re-read this guide carefully. Known traps are:
|
While this is a huge download, the Community Editions of Visual Studio are free (as in beer) and include the (great) Visual Studio integrated debugger. Visual Studio is also used to create official Wireshark builds for Windows, so it will likely have fewer development-related problems.
Download and install “Microsoft Visual Studio 2026 Community Edition”. The examples below are for Visual Studio 2026 but can be adapted for Visual Studio 2022 or 2019.
Check the checkbox for “Desktop development with C++”. The default component list is fine. You may uncheck components that you don’t require, but keep at least:
- “MSVC Build Tools for x64/x86 (Latest)”
- “Windows 11 SDK (XXXXX)”
- “C++ CMake tools for Windows”
It might be possible to build Wireshark using clang-cl, but this has not been tested. Compiling with plain gcc or Clang is not recommended and will certainly not work (at least not without a lot of advanced tweaking). For further details on this topic, see Section 4.4, “GNU Compiler Toolchain (UNIX And UNIX-like Platforms)”. This may change in future as releases of Visual Studio add more cross-platform support.
Get a Python 3 installer from https://python.org/download/ and install Python. Its installation location varies depending on the options selected in the installer and on the version of Python that you are installing.
The official command-line installer is available at https://git-scm.com/download/win.
While installing, select :
- (recommended) Select components : Uncheck "Windows integration"
- Adjusting your PATH environment : Git from the command line and also from 3rd-party software. Do not select the Use Git and optional Unix tools from the Windows Command Prompt option.
- (recommended) Choosing the SSH executable : Use external OpenSSH
- (recommended) Choosing HTTPS transport backend : Use the native Windows Secure Channel library
- (recommended) Configure the line ending conversions : Checkout Windows-style, commit Unix-style line endings
- Configuring the terminal emulator : Use Windows' default console window
- (recommended) Choose a credential helper : None
The main Wireshark application uses the Qt windowing toolkit.
![[Tip]](images/tip.svg) | Qt’s LTS branch |
|---|---|
|
As of of Qt 6, the Qt Company does not provide binary packages of Long Term Support (LTS) releases for open source use, and source packages are provided at a one year delay from the commercial LTS release. Thus the LTS branch is likely not an available option. To avoid unexpected bugs and regressions, we generally recommend using the same version of Qt used in the official Wireshark packages. For the current stable release at the time of this writing, that is 6.10.3. If you use another version, note that the last patch release of a Qt minor version is generally more stable than the first release of the next minor version, e.g. Qt 6.9.3 vs 6.10.0. |
Using the official Qt installer (see Section 2.3.1.4.2, “Install Qt using the official installer”) requires creating an account. A workaround is to use Another (unofficial) Qt CLI Installer instead.
You can choose installation folder of Qt. In the following example, we’re using C:\Development\Qt
mkdir C:\Development\Qt
cd C:\Development\Qt
curl.exe -LOJ https://github.com/miurahr/aqtinstall/releases/download/v3.3.0/aqt_x64.exe
.\aqt_x64.exe install-qt windows desktop 6.10.3 win64_msvc2022_64 -m debug_info qtmultimedia
Go to the "Download Qt for open source use” page, select "Download the Qt Online Installer" in the "Looking for Qt Binaries" section, select "Windows x86" or "Windows ARM64" as appropriate for your system, and download "Qt Online Installer for Windows (x64)" or "Qt Online Installer for Windows (ARM64)". When executing it, sign up or log in, and use Next button to proceed. When you are asked to select packages to be installed, select "Custom installation".
In the "Select Components" page, select your desired Qt version. We recommend using the same Qt version shipped with the Windows installers for the current stable Wireshark release, which at the time of this writing is Qt 6.10.3. Select the following components:
- MSVC 2022 64-bit or MSVC 2022 ARM64
- Qt Debug Information Files (contains PDB files which can be used for debugging)
Optionally, under "Additional Libraries" also select the following components:
- Qt Multimedia (to support advanced controls for playing back streams in the RTP Player dialog)
You can deselect all of the other the components such as “Qt Charts” or “Android xxxx” as they aren’t required.
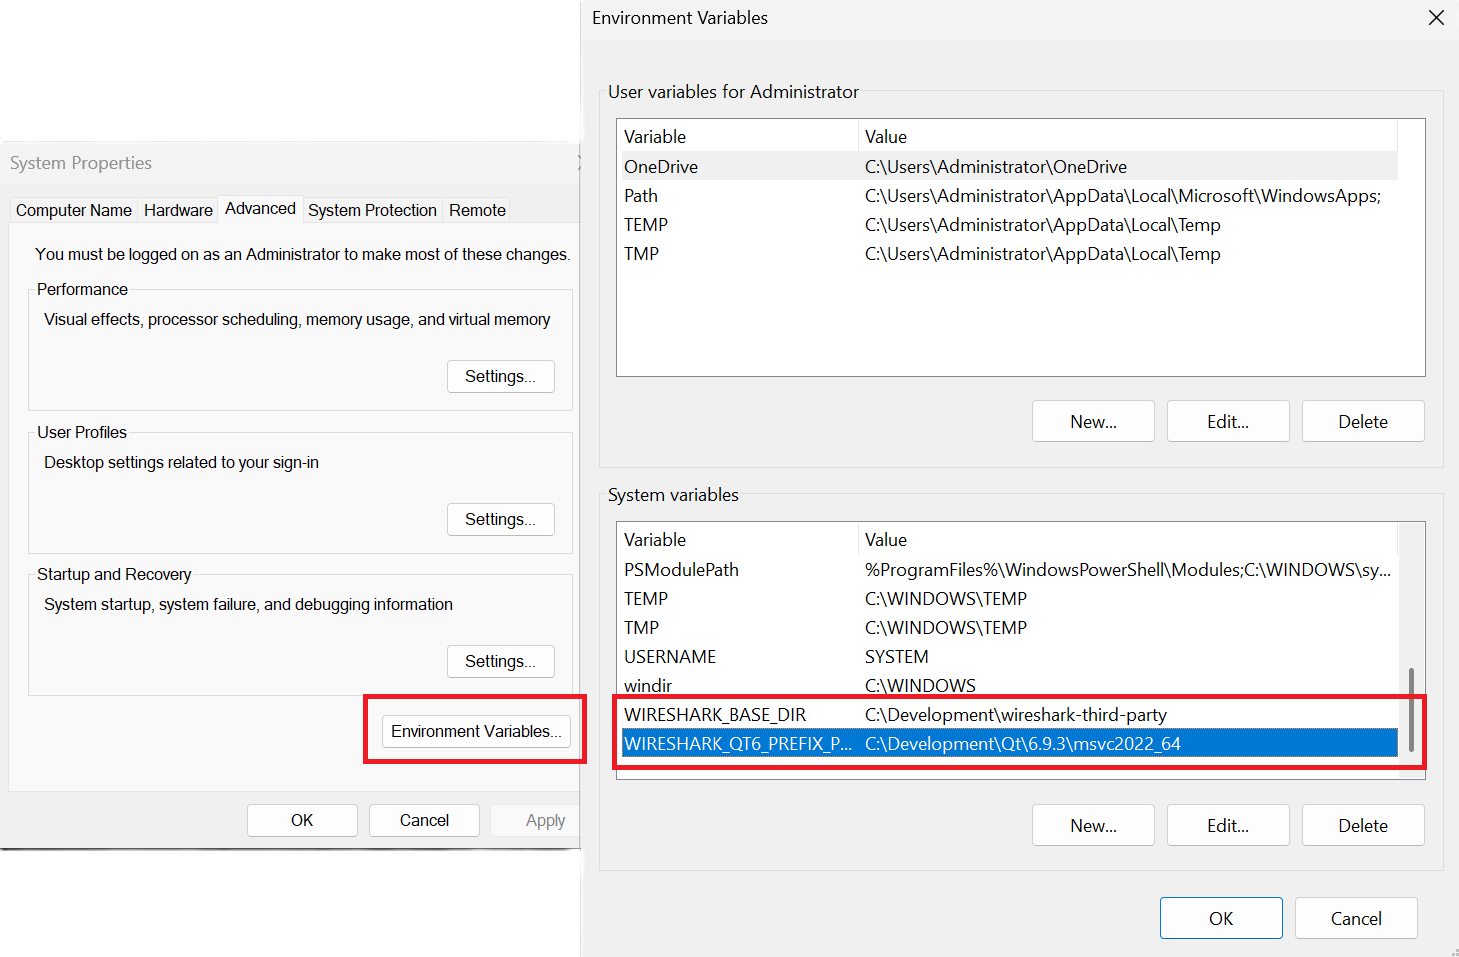
You need to set two configuration variables to be able to build wireshark:
-
WIRESHARK_BASE_DIR : where the third party libraries will be downloaded, e.g.
C:\Development\wireshark-third-party -
WIRESHARK_QT6_PREFIX_PATH (or CMAKE_PREFIX_PATH) (see
https://doc.qt.io/qt-6/cmake-get-started.html) : pointing towards the Qt installation directory, e.g.C:\Development\Qt\6.10.3\msvc2022_64
The easiest way is to set those variables globally, search for "Edit the System Environment Variables" in Windows > Environment Variables
 |
| Make sure everything works |
|---|---|
|
It’s a good idea to make sure Wireshark compiles and runs at least once before you start hacking the Wireshark sources for your own project. |
Download the wireshark sources into C:\Development\wireshark using either the command line :
cd C:\Development
git clone https://gitlab.com/wireshark/wireshark.git
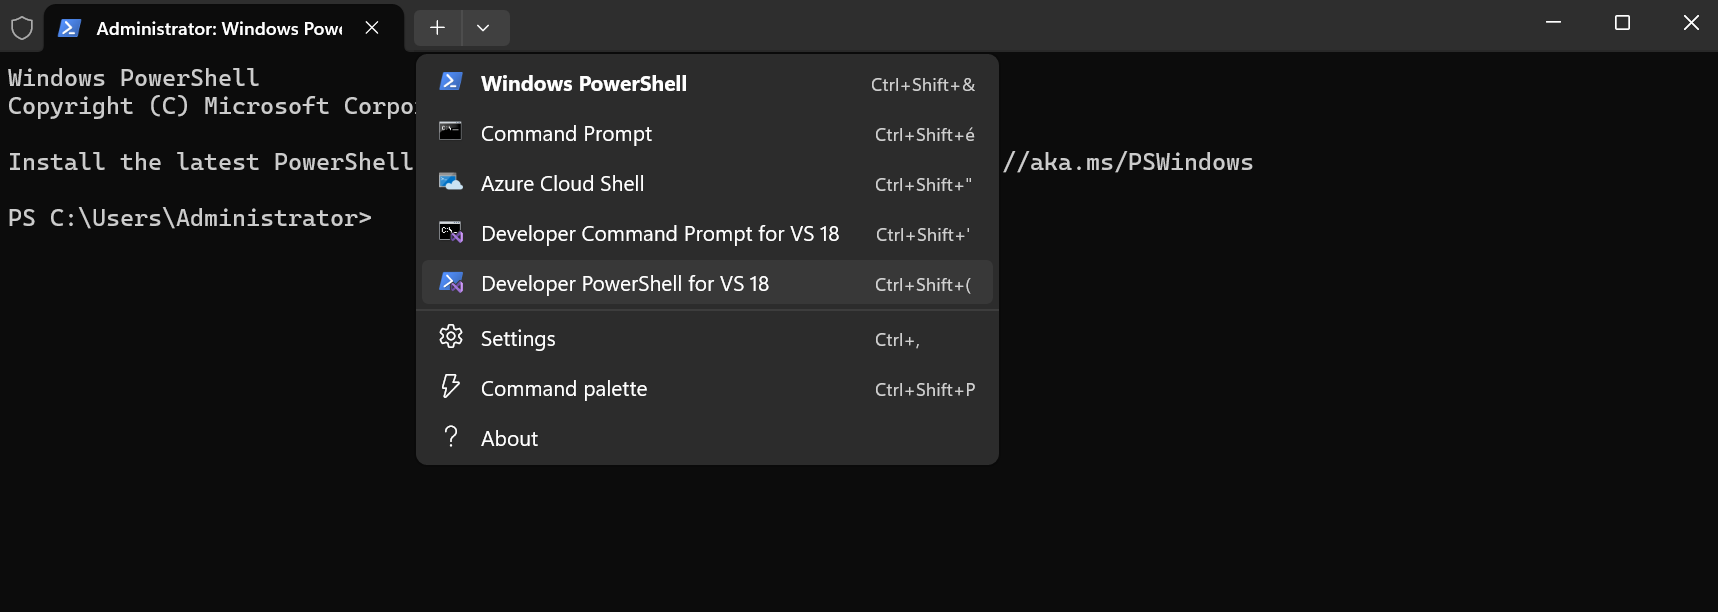
From the Start Menu (or Start Screen), open the “Windows Terminal”, then ”Developer PowerShell for VS 18” using the dropdown.
 |
If you have not already done so globally in Section 2.3.1.5, “Configure environment variables”, you can set the following environment variables, using paths and values suitable for your installation :
# Let CMake determine the library download directory name under WIRESHARK_BASE_DIR.
$env:WIRESHARK_BASE_DIR="C:\Development\wireshark-third-party"
# Set the Qt installation directory
$env:CMAKE_PREFIX_PATH="C:\Qt\6.10.3\msvc2022_64"
# Append a custom string to the package version. Optional.
$env:WIRESHARK_VERSION_EXTRA="-YourExtraVersionInfo"
Setting these variables could be added to a batch file to be run after you open the Visual Studio Tools Command Prompt.
They can also be passed directly to CMake, e.g. cmake -DWIRESHARK_BASE_DIR=…
CMake is best used in an out-of-tree build configuration where the build is done in a separate directory from the source tree, leaving the source tree in a pristine state. 64 and 32 bit builds require a separate build directory.
mkdir C:\Development\wsbuild64
cd C:\Development\wsbuild64
to create and jump into the build directory.
The build directory can be deleted at any time and the build files regenerated as detailed in Section 2.3.1.9, “Generate the build files”.
CMake is used to process the CMakeLists.txt files in the source tree and produce build files appropriate for your system.
To generate the build files enter the following at the Visual Studio command prompt (adjusting the path to the Wireshark source tree as required) :
cd C:\Development\wsbuild64
cmake -G "Visual Studio 18 2026" -A x64 ..\wireshark
The initial generation step is only required the first time a build directory is created. Subsequent builds will regenerate the build files as required.
To use a different generator modify the -G parameter.
cmake -G lists all the CMake supported generators, but only Visual Studio is supported for Wireshark builds.
32-bit builds are no longer supported.
The CMake generation process will download the required 3rd party libraries (apart from Qt) as required, then test each library for usability before generating the build files.
At the end of the CMake generation process the following should be displayed:
-- Configuring done
-- Generating done
-- Build files have been written to: C:/Development/wsbuild64
If you get any other output, there is an issue in your environment that must be rectified before building.
Check the parameters passed to CMake, especially the -G option and the path to the Wireshark sources and
the environment variables WIRESHARK_BASE_DIR and CMAKE_PREFIX_PATH.
Now it’s time to build Wireshark!
| Solution File Format |
|---|---|
|
Microsoft Visual Studio introduced a new XML-based solution file format, SLNX,
which became available in Visual Studio 2022 and is the default on Visual Studio
2026. If you are using the older file format, which is the default in Visual
Studio 2022 and earlier, replace |
-
Navigate to
C:\Development\wsbuild64 -
Open
Wireshark.slnx -
Choose the
RelWithDebInfoconfiguration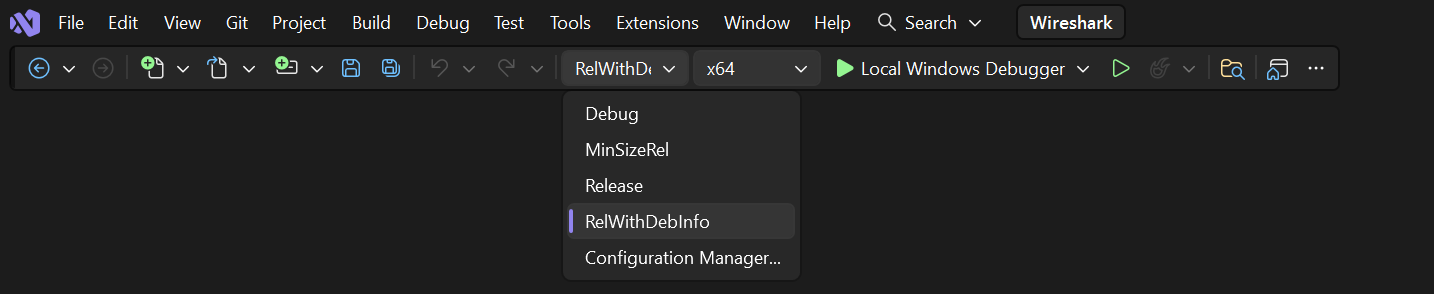
- Press Ctrl+Shift+B or Build > Build Solution
- Wait for Wireshark to compile. This will take a while, and there will be a lot of text output in the command prompt window
- Run C:\Development\wsbuild64\run\RelWithDebInfo\Wireshark.exe and make sure it starts.
- Open → . If it shows your "private" program version, e.g.: Version 4.7.3-myprotocol123 congratulations! You have compiled your own version of Wireshark!
You may also build Wireshark from Visual Studio command line, using :
cd C:\Development\wsbuild64
msbuild /m /p:Configuration=RelWithDebInfo Wireshark.slnx
| Tip |
|---|---|
|
If compilation fails for suspicious reasons after you changed some source
files try to clean the build files by doing |
The build files produced by CMake will regenerate themselves if required by changes in the source tree.
You can debug using the Visual Studio Debugger or WinDbg. See the section on using the Debugger Tools.
To build the Wireshark User’s Guide and the Wireshark Developer’s Guide,
build the all_guides target, e.g.
cd C:\Development\wsbuild64
msbuild doc\all_guides.vcxproj
Detailed information to build these guides can be found in the file doc/README.documentation.adoc in the Wireshark sources.
Building the documentation requires Xsltproc as an additional dependency :
Asciidoctor, xsltproc, and DocBook are required to build the documentation. CMake will download a pre-built version of Asciidoctor and DocBook on Windows, but xsltproc must be installed manually. You can install it using Chocolatey (https://chocolatey.org/install):
choco install -y xsltproc
Note: You should have successfully built Wireshark before doing the following.
If you want to build your own Wireshark-4.7.3-myprotocol123-x64.exe, you’ll need NSIS. You can download it from http://nsis.sourceforge.net.
Note that the 32-bit version of NSIS will work for both 64-bit and 32-bit versions of Wireshark. NSIS version 3 is required.
If you’ve closed the Visual Studio Command Prompt prepare it again. Run
msbuild /m /p:Configuration=RelWithDebInfo wireshark_nsis_prep.vcxproj
msbuild /m /p:Configuration=RelWithDebInfo wireshark_nsis.vcxproj
to build a Wireshark installer. If you sign your executables you should do so between the “wireshark_nsis_prep” and “wireshark_nsis” steps. To sign your installer you should place the signing batch script on the path. It must be named "sign-wireshark.bat". It should be autodetected by CMake, to always require signing set the -DENABLE_SIGNED_NSIS=On CMake option.
Run
packaging\nsis\wireshark-4.7.3-myprotocol123-x64.exe
to test your new installer. It’s a good idea to test on a different machine than the developer machine.
MSYS2 comes with different environments/subsystems and the first thing you have to decide is which one to use. The differences among the environments are mainly environment variables, default compilers/linkers, architecture, system libraries used etc. If you are unsure, go with UCRT64.
- Open the shell for the selected 64-bit environment.
- Download the Wireshark source code using Git, if you haven’t done so already, and cd into that directory.
-
Install needed dependencies:
tools/msys2-setup.sh --install-all
-
Build using CMake + Ninja:
mkdir build && cd build
# Ninja generator is the default
cmake -DENABLE_CCACHE=On ..
ninja
ninja test        # optional, to run the test suite
ninja install     # optional, install to the MSYS2 shell path
The application should be launched using the same shell.
- Follow the instructions above to compile Wireshark from source.
-
Build the NSIS installer target.
ninja wireshark_nsis_prep
ninja wireshark_nsis
If successful the installer can be found in $CMAKE_BINARY_DIR/packaging/nsis.
Alternatively you can also use the PKGBUILD included in the Wireshark source distribution to compile Wireshark into a binary package that can be installed using pacman.
The official Wireshark Windows installer is compiled using Microsoft Visual Studio (MSVC). Currently the MSYS2 build has the following limitations compared to the build using MSVC:
- Lua does not have custom UTF-8 patches.
- The Event Tracing for Windows (ETW) extcap cannot be compiled using MinGW-w64.
- Enhanced Kerberos dissection with decryption is not available.
Using WSL2 on a Windows machine can provide a quick and easy way for beginners
to get started. This section will focus on using the official Debian
distribution installed from the wsl CLI command or Windows App Store.
This will allow for a quick and easy way to build Wireshark. Please note that while this guide is sufficient for an environment to build and test minor changes, some changes and enhancements will still need to be built and tested for Windows as described in the sections above.
To install WSL2 for the first time and Debian via the CLI run (as administrator):
wsl --install
wsl --install -d Debian
Please see the documentation on WSL for help with installation.
From here following the build guide for Debian based Un*x systems should finish the setup of the build environment. See Section 2.2, “UN*X” for details on compiling, building, and running Wireshark on Debian. WSL2 supports both X11 and Wayland to enable the use of GUI applications without any additional requirements. Please see the WSL2 reference of GUIs for more detail.
![[Note]](images/note.svg) | For First Time Contributors |
|---|---|
|
It is highly recommended to review the source control process before attempting to build any changes. Please see: For a description of the process. |
It is possible to compile Wireshark for Microsoft Windows using Linux and MinGW. This way developers can deploy Wireshark on Windows systems without requiring a Windows host machine. Building for Windows using a Linux host is also easier for devs already familiar with Linux, the build itself is faster and it uses a very mature C/C++ compiler (GCC) and debugger (GDB).
Fedora Linux provides the best out-of-the-box support for MinGW cross-compilation. Fedora is what the project uses to test the build and it’s what we recommend. While any other reasonably modern Linux distribution can be used, that will make the process more time consuming and involve some trial and error to setup.
The build instructions on Fedora follow the familiar recipe for building Wireshark using Linux.
-
Install needed dependencies:
tools/mingw-rpm-setup.sh --install-all
-
Build using CMake + Ninja:
mkdir build && cd build
mingw64-cmake -G Ninja -DENABLE_CCACHE=Yes -DFETCH_lua=Yes ..
ninja
Note that currently it is not possible to run the test-suite when cross-compiling.
-
Build the NSIS installer
ninja wireshark_nsis_prep
ninja wireshark_nsis
If successful the installer can be found in $CMAKE_BINARY_DIR/packaging/nsis.
- Only the MSVCRT C library for Microsoft Windows can be used. Support for the UCRT (Universal C Runtime) library on Fedora Linux is in the initial stages of deployment and not ready for prime-time (at the time of this writing).
- Some optional dependencies are missing from Fedora repositories and must be compiled from source if desired. An up-to-date complete list can be found in the bug tracker (issue 19108).
- Lua does not have custom UTF-8 patches.
- The Event Tracing for Windows (ETW) extcap cannot be compiled using MinGW-w64.
- Enhanced Kerberos dissection with decryption is not available.
Arch Linux has good support for MinGW using packages from the AUR. Note that the mingw-w64 AUR packages sometimes break. If that happens you may be required to fix it or skip the package until it is fixed by the maintainer, if it’s an optional dependency. You may also want to consider using an unofficial user repository (such as the ownstuff repository) to provide pre-compiled packages. This will greatly simplify the initial setup and subsequent upgrades.
![[Caution]](images/caution.svg) | Caution |
|---|---|
|
AUR packages and unofficial user repositories are user-produced content. These packages are completely unofficial and have not been thoroughly vetted. It is your decision whether to trust their maintainers and you take full responsibility for choosing to use them. |
You will need to install an AUR helper.
This guide assumes paru is being used.
-
Install required dependencies from official repositories:
pacman -S mingw-w64 nsis lemon qt6-tools ccache
-
Install required dependencies from the AUR:
paru -S mingw-w64-cmake
paru -S mingw-w64-glib2
paru -S mingw-w64-libgcrypt
paru -S mingw-w64-libxml2
paru -S mingw-w64-c-ares
paru -S mingw-w64-speexdsp
paru -S mingw-w64-libpcap
-
Install Qt6:
paru -S mingw-w64-qt6-base mingw-w64-qt6-multimedia
-
Install optional dependencies:
paru -S mingw-w64-gnutls
paru -S mingw-w64-lz4
paru -S mingw-w64-snappy
paru -S mingw-w64-opus
paru -S mingw-w64-opencore-amr
paru -S mingw-w64-libnghttp2
paru -S mingw-w64-libssh
paru -S mingw-w64-minizip
Search the AUR for other dependencies not listed above.
-
Build Wireshark using CMake + Ninja. From the directory containing the Wireshark source tree run:
mkdir build && cd build
x86_64-w64-mingw32-cmake -G Ninja -DENABLE_CCACHE=Yes -DFETCH_lua=Yes \
      -DMINGW_SYSROOT=/usr/x86_64-w64-mingw32 ..
ninja
This will automatically download and build Lua as a static library.
To reconfigure the CMake build you may to do it explicitly by running
x86_64-w64-mingw32-cmake .in the build directory, instead of lettingninjado it for you automatically. -
Build the NSIS installer
ninja wireshark_nsis_prep
ninja wireshark_nsis
If everything goes well the installer can be found in $CMAKE_BINARY_DIR/packaging/nsis.
The same notes as the build using Fedora apply.